Het delen van beste praktijken
Krijg inzicht in strategieën voor succesvolle samenwerking en leer hoe u wachtwoorden succesvol deelt met een team.
Gebruik delen - het is een uitstekende manier voor uw team om samen te werken
Delen is een van de krachtigste functies van Password Boss en biedt u een veilige manier om samen te werken met uw team.
Sharing items in Password Boss
How Sharing Works
Share Permissions
Editor
- View all item details, including passwords.
- Edit fields.
- Add items to the share.
- Remove the Owner.
- Convert the share to a vault.
Read‑Only / Password Visible
- View everything, including passwords.
- Use autofill.
- Edit or delete.
- Add items.
Read‑Only / Password Hidden (Invisible)
- Use autofill to log in without seeing the password.
- Access non‑sensitive metadata (if allowed).
- View or copy the password.
- Access hidden fields.
- Extract credentials via extension or API.
Updated Behavior
- Copy Password is fully suppressed in the WebApp and Browser Extension.
- Autofill remains available.
-
Invisible access does not migrate when converting to a vault
How to share items
Shared items normally appear in the recipient's account a few minutes after creating the Share. Recipients will receive an in‑app prompt to accept the share.
WebApp
-
Open Password Boss.
- From the left menu, choose Share Center.
- Click on the Add Share button
 to create a new Share.
- The Create a new Share window will open.
-
Select the profile you want to share items from.
- Check the box next to each item or folder you want to share.

7. Click Next.
8. Enter a Name for the Share, add recipients, pick a permission (Invisible, Read, Editor), and click Add, use the How Long Should the Items be Shared feature (optional), and Save Share.


The recipient can then open the Share Center, and on the Shared with Me tab they can Accept or Decline the Share.
Desktop
-
Open Password Boss.
- From the left menu, choose Share Center.
- Click on the orange circle
 to create a new Share.
- The New Shared Item window will open.
-
Select the profile you want to share items from.
-
Check the box next to each item or folder you want to share.

- Click Next.
- Enter a Name for the Share, add recipients, pick a duration and click Share item.

- The recipient can then open the Share Center, and on the Shared with Me tab they can Accept or Decline the Share.
iOS
-
Open Password Boss.
- From the bottom menu, tap More

- Tap Share Center.
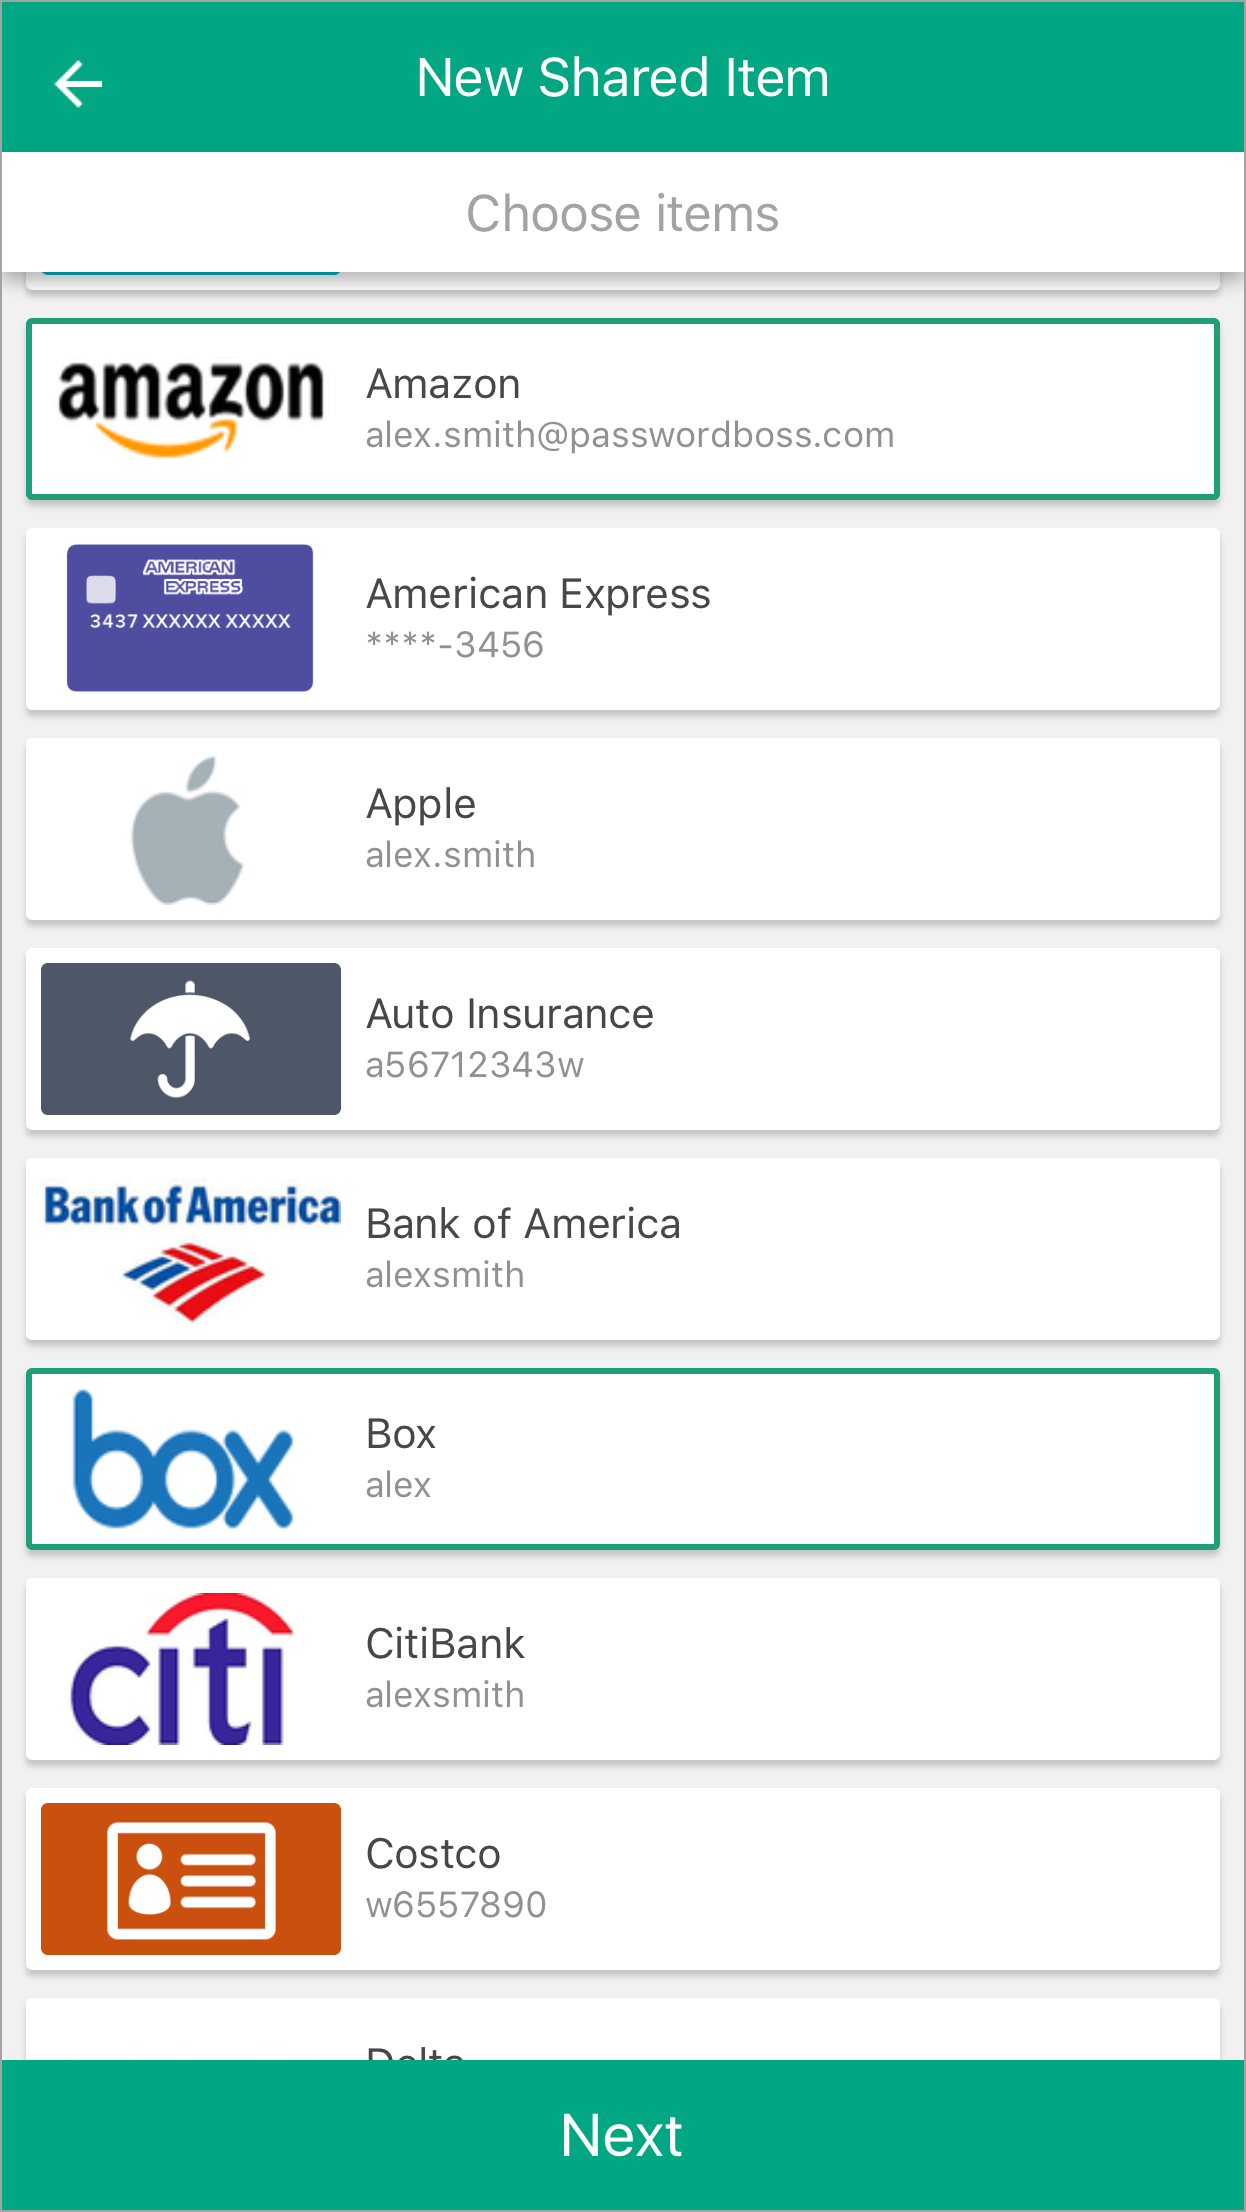
- Tap the green and white circle

- Tap Individual Items or Entire Folder.
-
Tap the items you want to share.

- Tap Next.
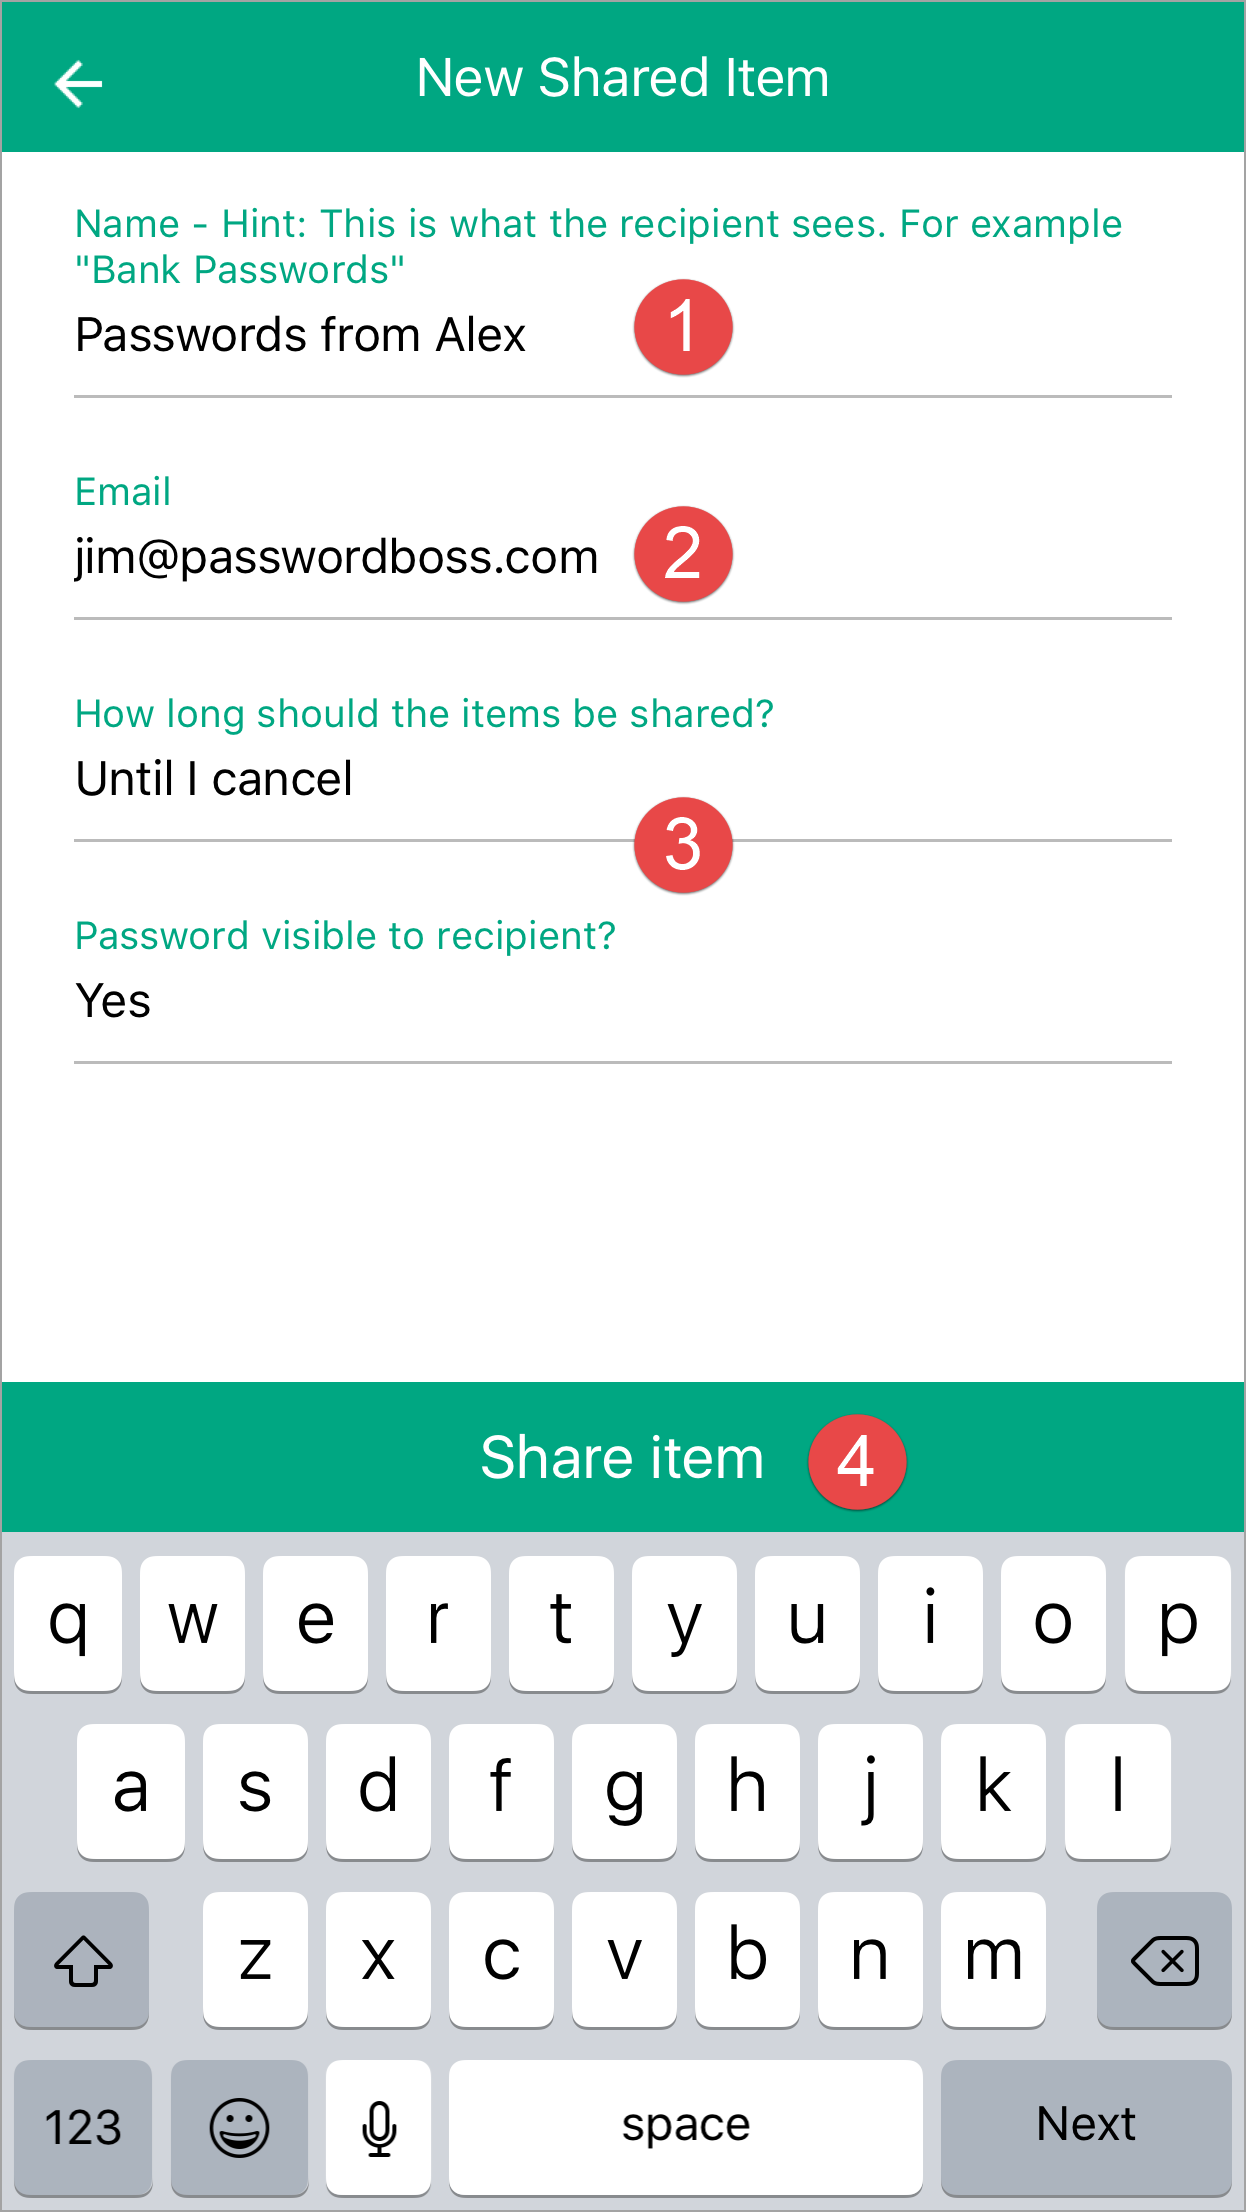
- Enter a Name for the Share, add recipients, pick a duration, and tap Share item.

- The recipient can then open the Share Center and on the Shared with Me tab, they can Accept or Decline the Share.
Android
-
Open Password Boss.
- From the top left tap the menu icon

- Tap Share Center.
- Tap on the orange circle

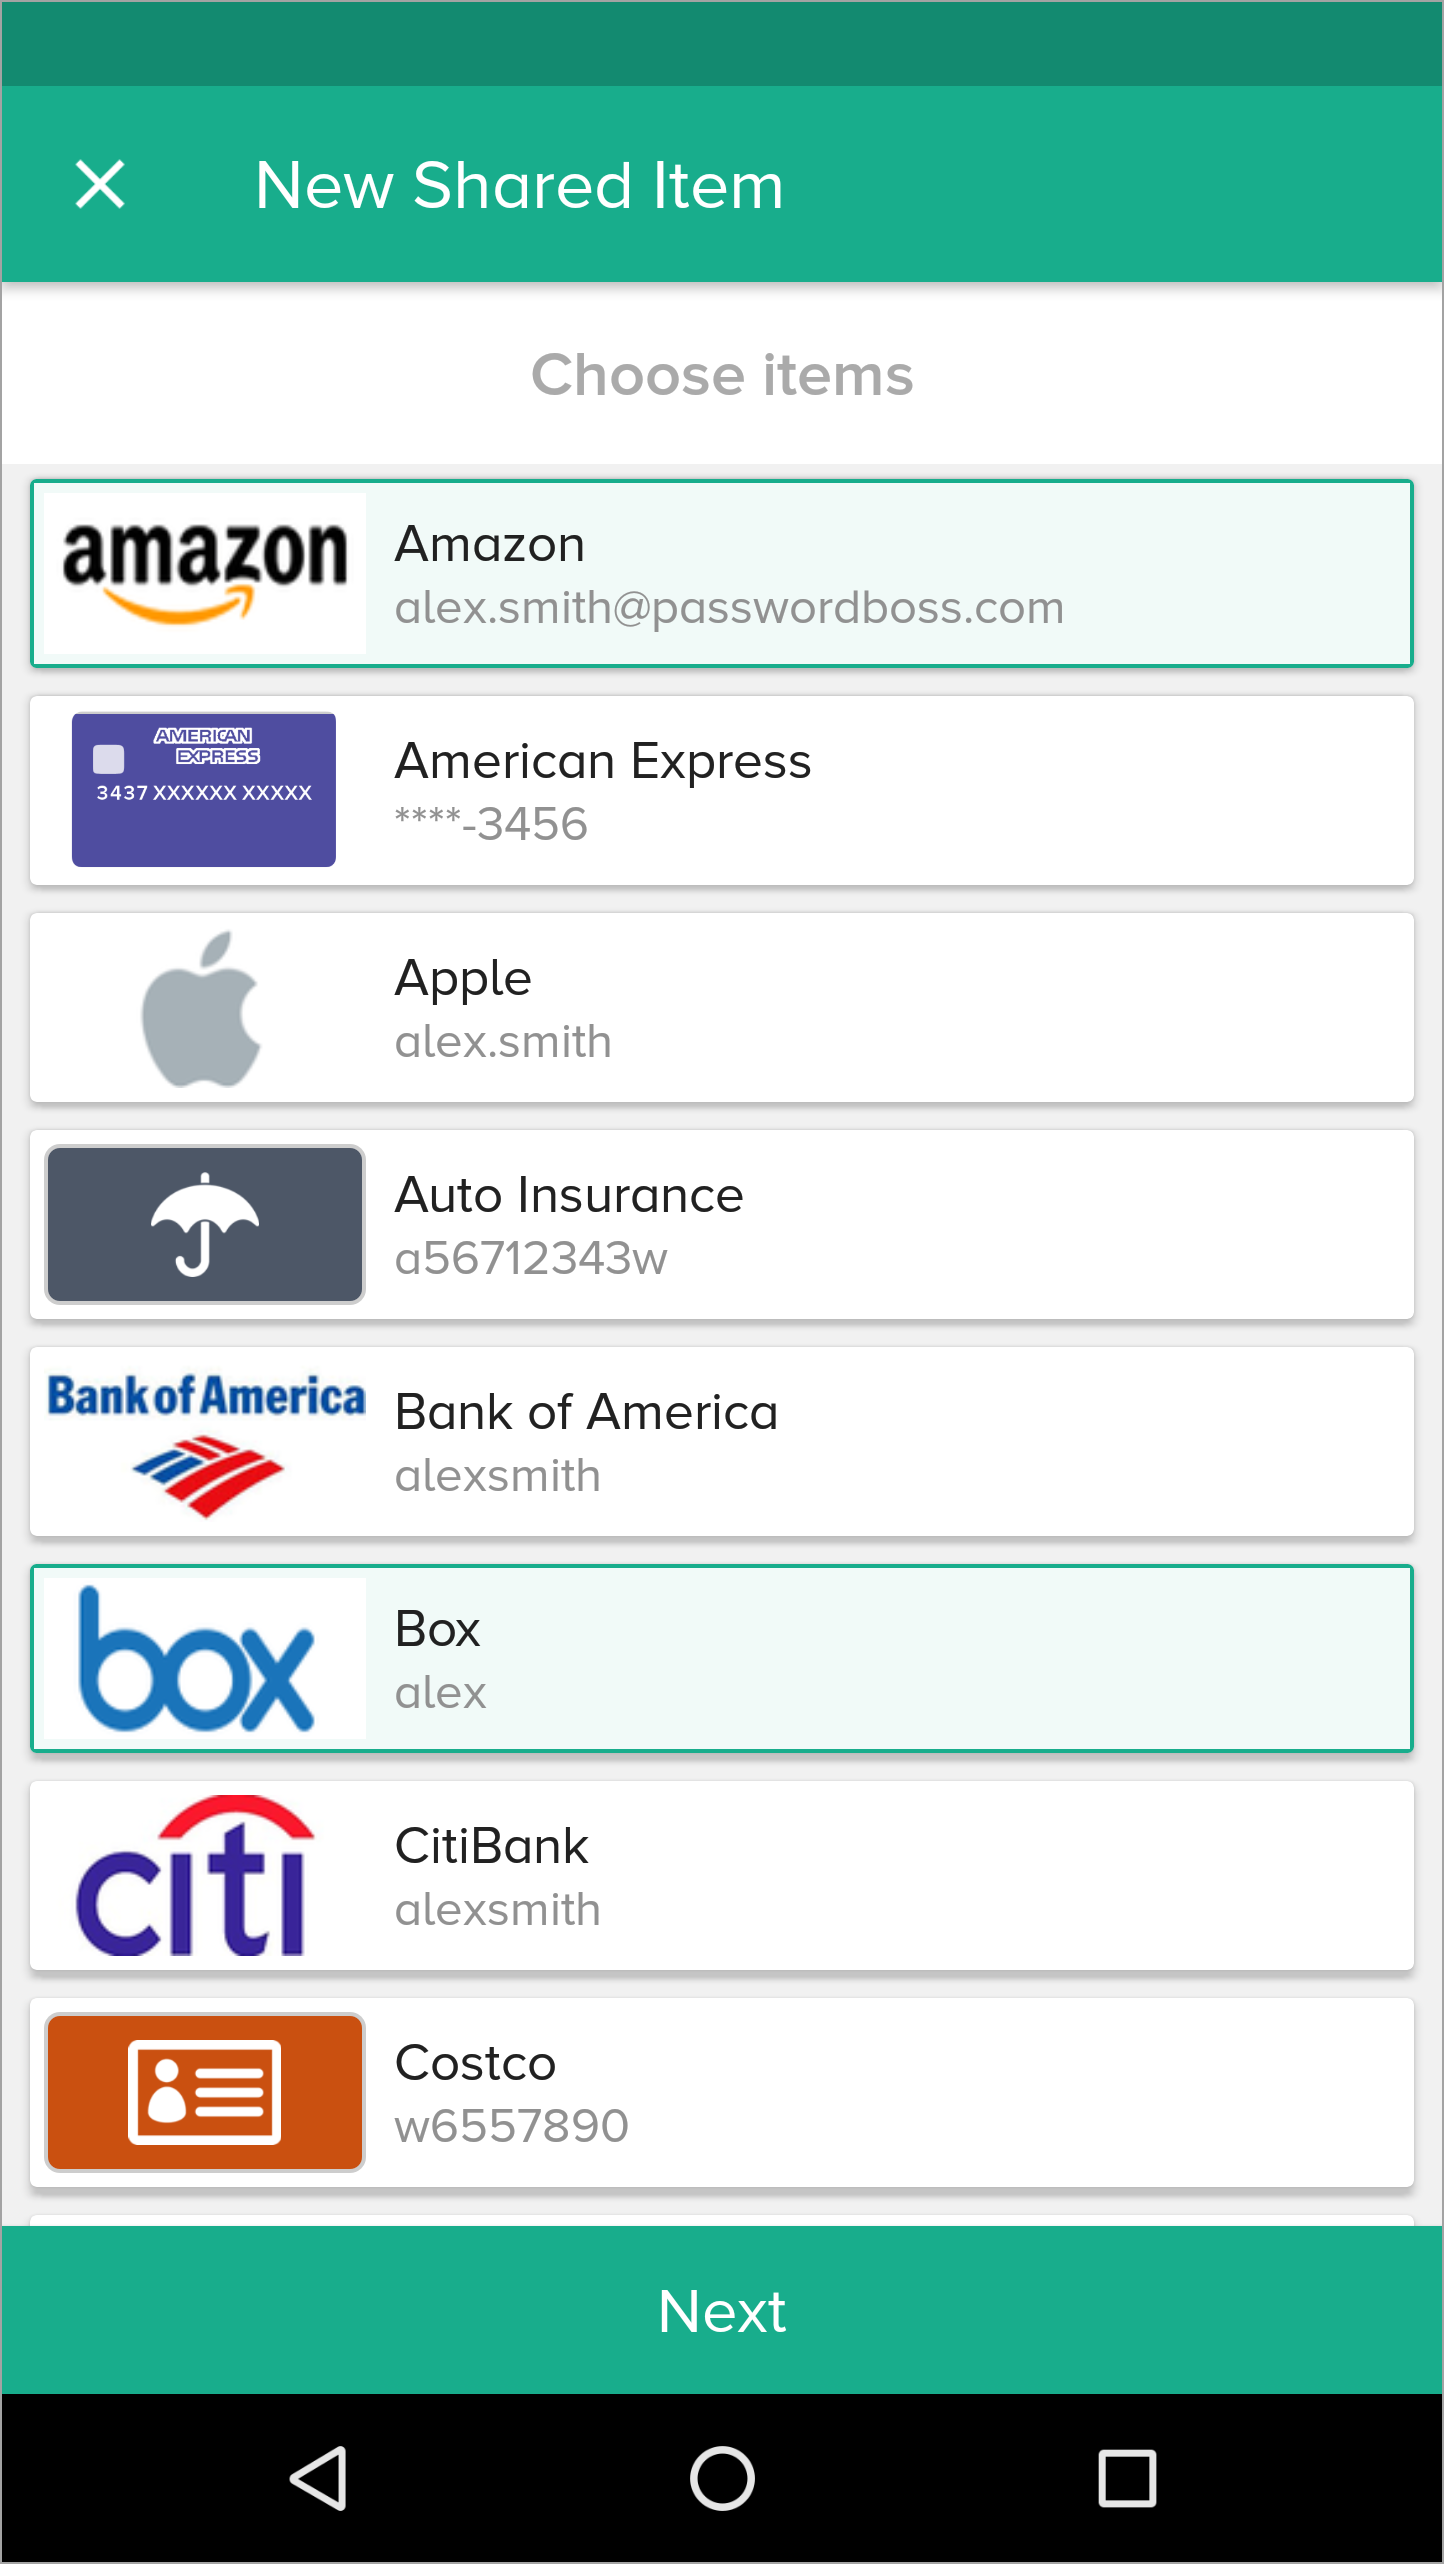
- Tap Individual Items or Entire Folder.
-
Tap the items you want to share.

- Tap Next.
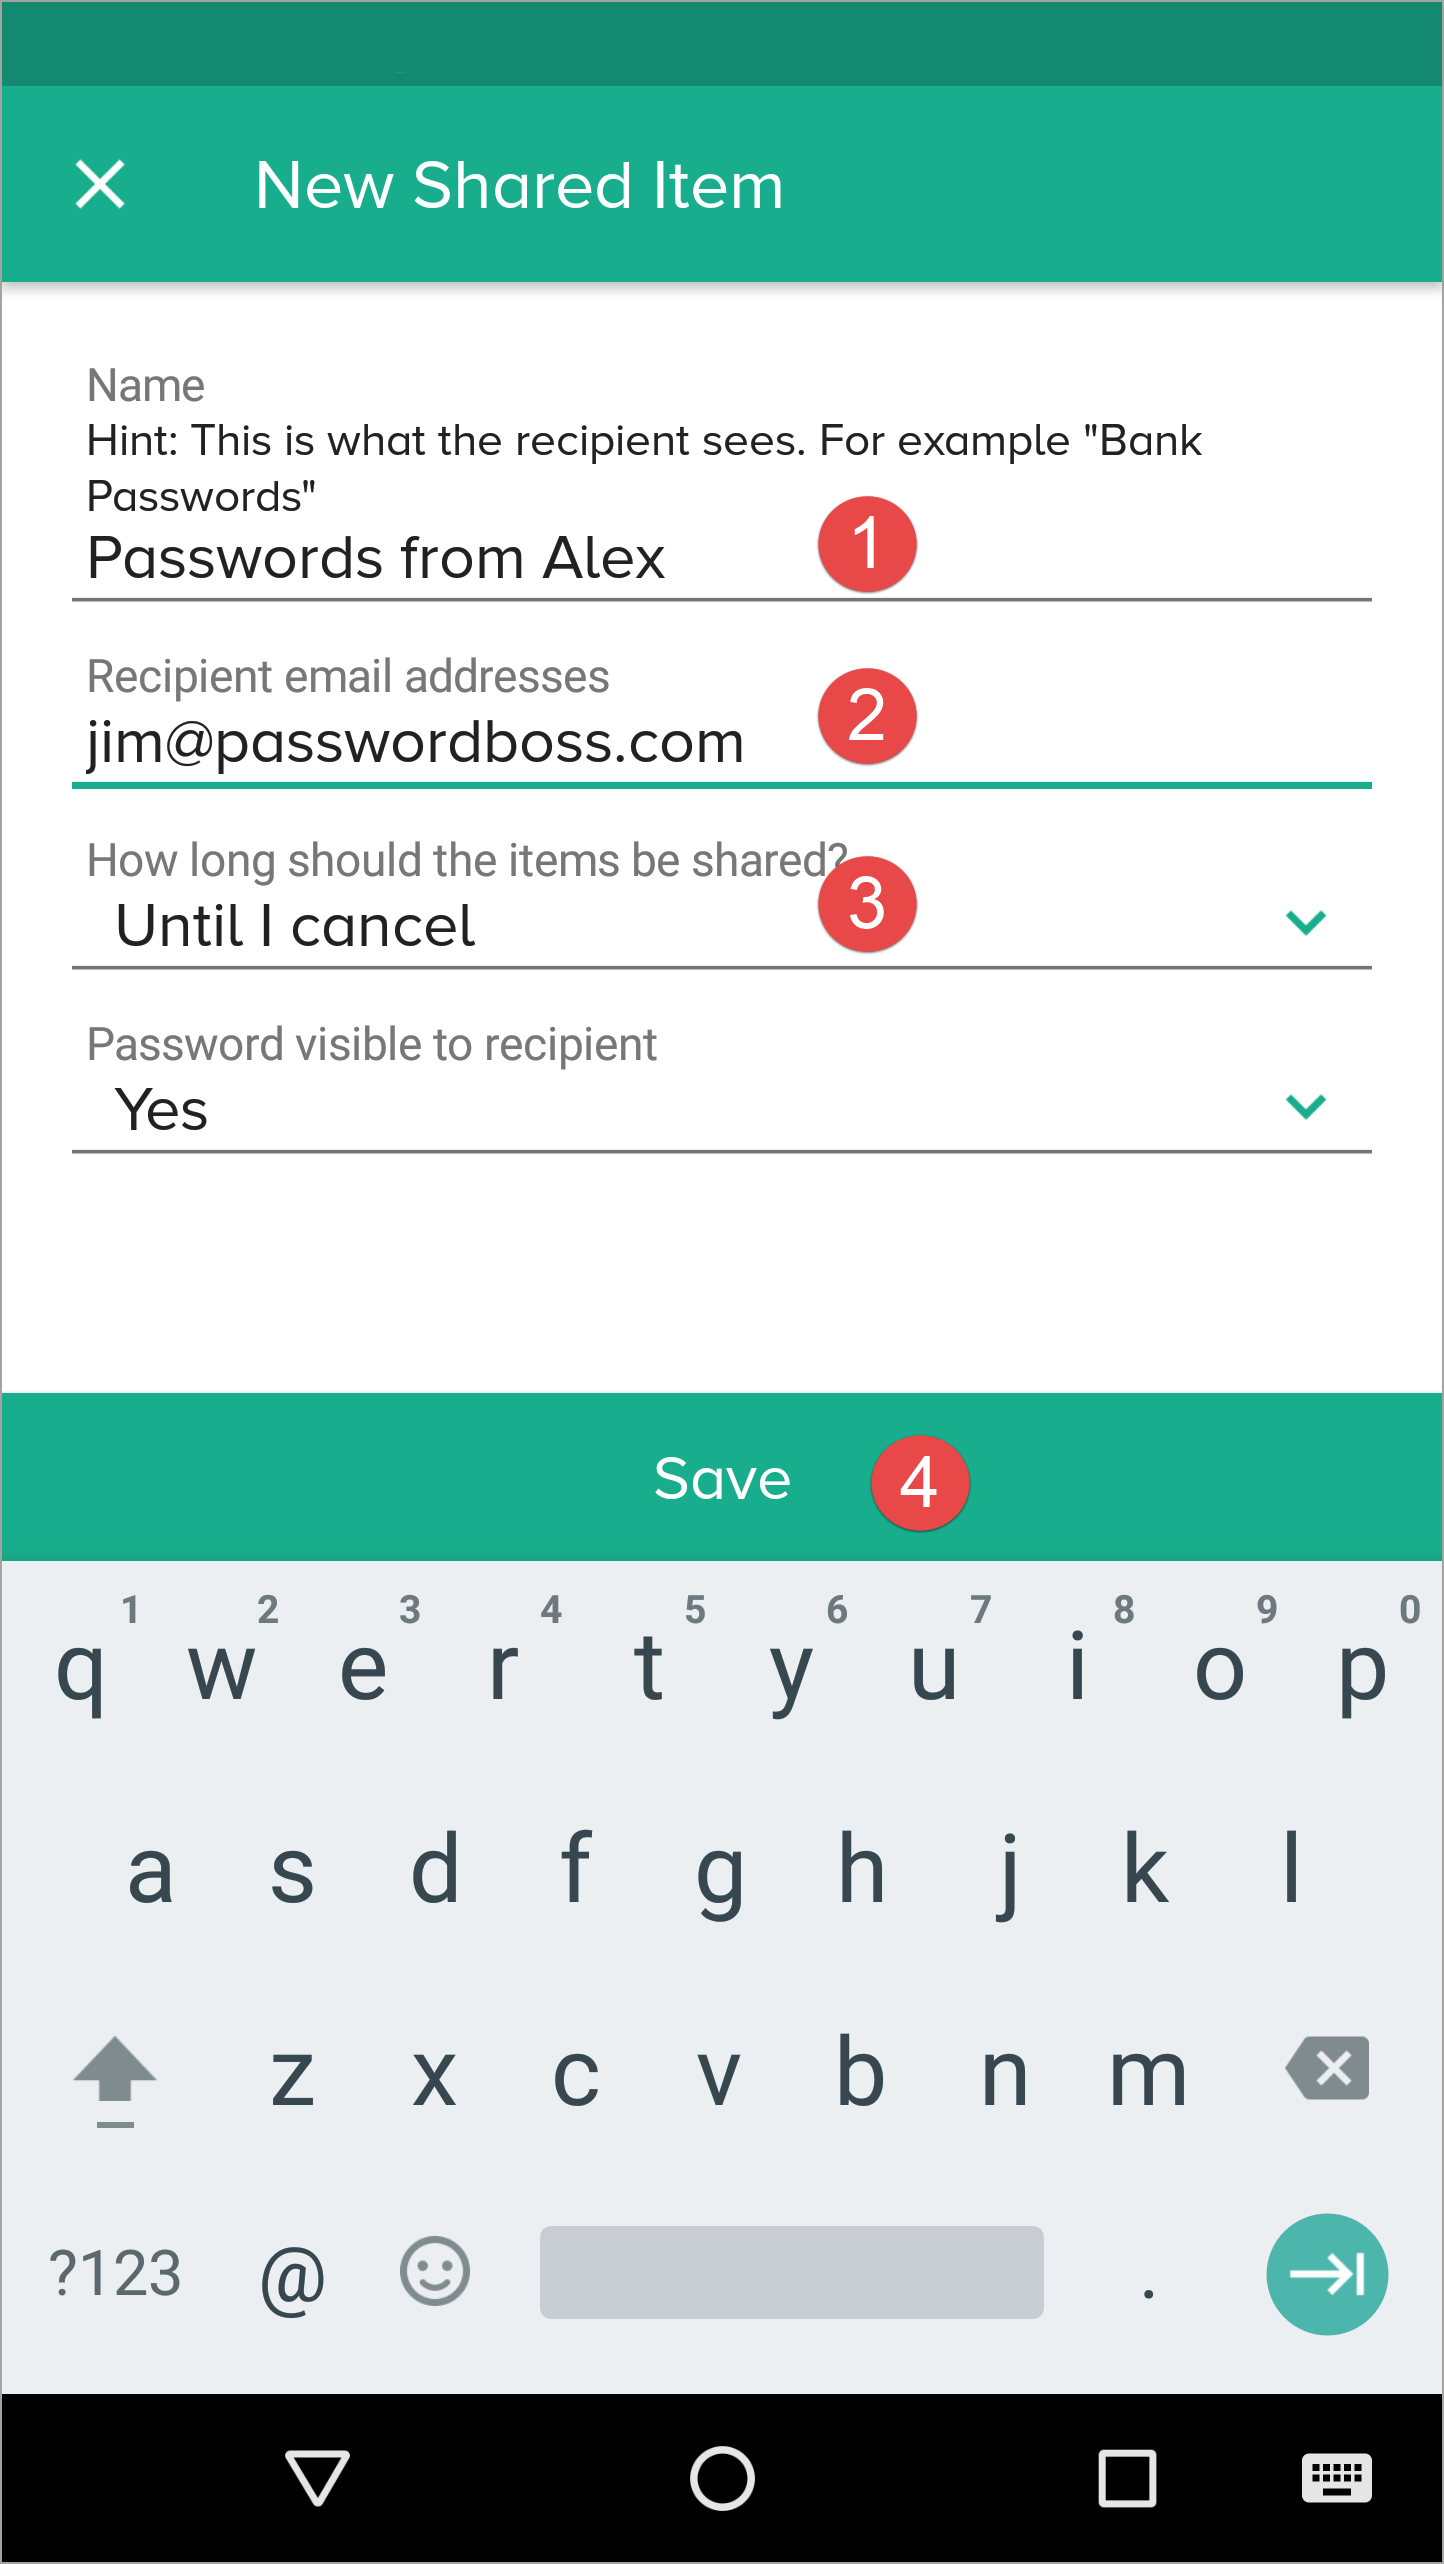
- Enter a Name for the Share, add recipients, pick a duration, and tap Share item.

- The recipient can then open the Share Center and on the Shared with Me tab,they can Accept or Decline the Share.
Managing Existing Shares
Actions Include:
- Changing roles (Invisible → Reader → Editor).
- Removing a recipient.
- Reviewing activity logs.
Converting a Share to a Vault
When to Convert
- Multiple people need ongoing access.
- You want role‑based management.
- You want the ability to assign multiple Owners.
Important Rules
- Items are moved to the vault.
- Clone items in other shares stop being shared elsewhere.
- Invisible recipients are not added to the vault.
- Former recipients must be assigned Vault roles manually.
Behavior in the Browser Extension
- Editor: Full view, editing shortcuts.
- Read‑Only Visible: View and autofill.
- Invisible: Autofill only; no copy, no reveal.
Behavior on Mobile Apps
- Password visibility follows permission level.
- Invisible users attempting to reveal a password see a Not permitted message.
- TOTP is shown only if visibility is part of the assigned role.
Security Considerations
- Sharing uses Zero‑Knowledge encryption.
- Only the Owner and approved recipients can decrypt items.
- Invisible mode exists to allow login use without exposing secrets.
- Activity Logs track role changes, recipient additions/removals, and vault migration.
Summary
- Sharing supports granular permissions.
- Invisible users have the strictest restrictions and cannot migrate to vaults.
- Role changes take effect instantly everywhere.
- Converting shares to vaults centralizes control and enhances team management.
Gebruik groepen om items te delen
Een beheerder van uw team kan groepen gebruikers op de portal maken, bijvoorbeeld voor Marketing, Financiën, HR, enzovoort. Wanneer er gebruikers aan uw team worden toegevoegd of eruit worden verwijderd, kan de beheerder het groepslidmaatschap op de portal bijwerken.
Wanneer u gedeelde items aanmaakt, kiest u groepen in plaats van individuen als ontvangers. Wanneer groepen worden gebruikt, hoeft u de gedeelde items niet te bewerken wanneer uw teamlidmaatschap verandert. Zolang de teamleden van de gebruiker aan de groepen op de portal worden toegevoegd, ontvangen ze automatisch de gedeelde gegevens wanneer ze inloggen op hun Password Boss account.
Use groups to manage users
Why you should use groups
Groups are designed to make it easy to manage recipients of shared items. The benefits of using groups include:
- Shares sent to groups are automatically updated as the membership changes. If shares are sent to individuals, each must be manually edited as the recipient list changes.
- It is quicker to manually choose groups as recipients then add each recipient individually.
- If you need to review a share and who has permission to share, you do not need to scroll through long lists of recipients.
The Everyone group
All teams have an Everyone group that is automatically created for your team. The Everyone group contains all team members from your account. The membership of the Everyone group is maintained automatically by Password Boss.
The Everyone group includes everyone in your account. Only share to the Everyone group as a recipient when all team members need access to the shared items. If only some team members need access to the shared items, create a new group with limited membership.
Use meaningful names for groups
- Use names for your groups that describe the group so that other team members can identify the group. Group names that identify the group, project, or department make it easy for other team members to know what the group is for. Examples: Marketing, Finance, Project Alpha.
- Consider adding the permissions to the name of the group.
- Depending on your team structure, it may be useful to create groups that will be used to assign read-only permission and other groups with editor permissions. Examples: Marketing-Read Only, Marketing-Editor, Sales-Read Only, Sales-Editor, Admin-Read Only, Admin-Editor.
Avoid duplicating groups
Keep your list of groups concise and avoid making groups that duplicate the membership in an existing group.
How to create groups
- Login to the Password Boss portal as an admin for your team.
-
Click Users & Groups from the left menu.
- Scroll down to the Groups section.
- Click +Create New Group.
-
Enter a group name and click save.
How to add or remove users from a group
- Login to the Password Boss portal as an admin for your team.
-
Click Users & Groups from the left menu.
- Scroll down to the Groups section.
-
Find the group you want to change.
- From the blue Actions button
 Choose Edit.
-
Add or remove users from the group. You can also edit the name of the group from this screen.
-
Click Save when you are done.
How to delete groups
- Login to the Password Boss portal as an admin for your team.
-
Click Users & Groups from the left menu.
- Scroll down to the Groups section.
-
Find the group you want to change.
- From the blue Actions button
 Choose Delete.
- On the confirmation screen, click Delete group.
Rollen en machtigingen begrijpen
Wanneer u een share maakt, kunt u machtigingen gebruiken om de zichtbaarheid van wachtwoorditems in de share te bepalen.
Rollen en machtigingen voor ontvangers van gedeelde items
Ontvangers van gedeelde items, of het nu mappen of individuele items zijn, kunnen drie mogelijke rechten hebben. Dit artikel legt elk van deze rechten uit.
Editor
- De krachtigste toestemming
- Gebruikers kunnen alle velden zien en wijzigen.
- Gebruikers kunnen nieuwe items aan de share toevoegen.
- Alle wijzigingen van een redacteur worden rechtstreeks naar alle ontvangers verzonden. Wijzigingen hoeven niet via de share-eigenaar te worden verzonden.
Alleen-lezen / Wachtwoord zichtbaar.
- Gebruikers kunnen het wachtwoord en alle andere velden van een item zien.
- De gebruiker kan geen velden van het item of de share wijzigen.
Alleen-lezen / Wachtwoord niet zichtbaar.
- Meest beperkende toestemming
- Gebruikers kunnen het wachtwoord niet zien, maar kunnen wel inloggen op een site.
- De gebruiker kan geen velden van het item wijzigen.
🚧 Belangrijke opmerking over "Alleen-lezen / Wachtwoord niet zichtbaar"
"Alleen-lezen - wachtwoord niet zichtbaar" blokkeert de toegang van de ontvanger tot het wachtwoord niet. Deze machtiging blokkeert de toegang van de ontvanger tot het wachtwoord in de Password Boss -applicatie. Nadat het wachtwoord op een website is ingevoerd, kan Password Boss niet langer voorkomen dat een gebruiker het wachtwoord rechtstreeks van de webpagina opvraagt.